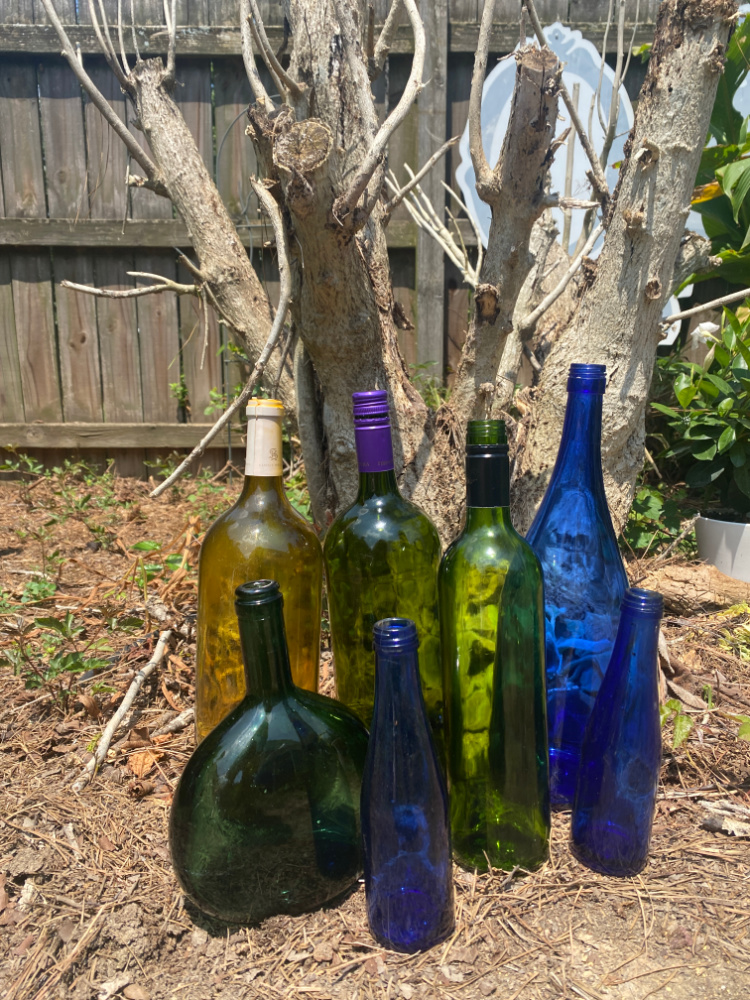
I remember the first time a saw a collection of bottle trees in someone’s garden. I suppose the odd sight appealed to me because of my love for colored glass. I was thrilled with the eclectic visual boost the bottle trees gave to the lovely garden. When I discovered that bottle trees were deeply rooted in folk history, I was hooked.
Most believe that bottle trees got their roots in the Congo area of Africa in the 9th Century A.D. Other sources date bottle trees back to 1600 B.C. Tales evolved and circulated that spirits could live in them – probably from people who heard wind moaning over the bottles, which led to the belief that “bottle imps” could be captured in glass vessels. Blue bottles were hung upside down on trees and huts as talismans to ward off evil spirits. Bottles were also tied to trees near important locations such as meeting places or crossroads to trap any spirits that were travelling.
Personally, I just love colored glass. I usually have colored wine bottles, vases, and antique vessels on a shelf inside my kitchen window. I love the way the light catches the colors. Colored glass is something I always search through when I wander into an antique store when traveling.
Wine bottle trees come in many different shapes and forms even hanging!
Many wine bottle trees are homemade of rebar which can be shaped into many different shapes.
Speaking of creative projects, it’s time for the monthly Thrift Store Decor Team projects. That’s right, it is the second Wednesday of the month. My creative team members and I have brand new thrifty decor DIY projects for you. Check them out at the end of this post!
Homegrown Wine Bottle Tree
This was once a thriving Rose of Sharon ornamental bush.
It had become quite large. My friend, Rose, gave me a small clipping which eventually yielded several other small bushes that I scattered around my yard. This particular bush was the largest and lasted around 10 years. About 2 years ago, we had an unseasonable cold winter, for Alabama. And this shrub did not survive.
The other day, we were in the pool. G-baby Blu (just turned 7!!!!) was swimming. We were watching some itty bitty lizards on the Cannas when I thought…bottle tree branches! So, that’s how we arrived at this project. Let’s turn this shrub carcass into a wine bottle tree!
First step, was to clean up this sad looking carcass of a shrub. As I am prone to rash from poison ivy, Mr. Blu, and his helper Mia, took on this task and cleared all of the miscellaneous vines and weeds from around the base of the shrub.
I gathered bottles from around the house. I did have to indulge in some wine over the last few weeks to increase my number of on hand EMPTY wine bottles.
I removed the labels and capsules from the bottles. Educational tip for the day: A capsule is a metal wrapping around holds cork tightly preventing the wine from drying up or evaporating too quickly.
I gave all of the bottles a cleaning and I was off to the bush carcass.
Test Your Wine Bottle Tree Branches
I randomly placed some bottles on the branches to see if I would need to stagger the height of the branches to make the bottle tree more visually appealing. I wasn’t sure if this would be necessary as my bottles were of various sizes.
It was during this process that I realized how rotted the branch were. While some of the larger branches were secure, many of the smaller ones were quite rotted. So, I tested their strength and ability to hold the weight of the bottles. Some of the branches actually broke of under the weight of the bottles. The last thing I want is broken glass around the pool. Although no one really walks around this side of the pool, broken glass and pools are never a good fit. So, once this project is completed, I will removed the old stump and relocate the bottle somewhere else in the yard.
To remedy the broken branches, I would just add some “faux” branches.
I had just trimmed up a crepe Myrtle nearby and had many discarded limbs waiting to be place curbside for trash removal. I cleaned a few of the limbs , snapped them to desired length and grabbed my Ryobi cordless drill. I selected a few empty spaces among the branches. I drilled a hole about 2 inches into the branch angled like the true limbs would be. I slipped the replacement branch into the hole and gave her a firm wiggle to see if she would adequately hold a wine bottle. On a few holes, I had to drill a little deeper to ensue the stability of my replacement branch.
The holes were trial and error. I worked my way around the stump until many of the spaces were filled with beautiful glass bottles. I did have to make some adjustments after a small storm as some more of the branches had broken off.
I just filled in the empty areas with more branches.
I have a bottle tree on my deck filled with special bottles that I have collected in my travels. I have bottles from Ireland, London, and Paris. V brought me a bottle from Hein Spain. We mark special occasions by saving bottles as well.
Here is the finished bottle tree.
There are some spaces that can be filled in as I find more bottles. I need to find some red! How cool would those be?
As promised, here are the other projects from the Thrift Store Decor Team. We are excited to move into the fall season and start our seasonal and holiday projects. Enjoy!
Vintage Picnic Basket Makeover
Repurposed Rustic Table Centerpiece
Upcycle Idea for an Under Cabinet Paper Towel Holder
Create Your Own Bottle Trees In Your Garden
